Serafina Scrapping

Monday, December 6, 2010
Thursday, December 2, 2010
Titi Name Plate
This is a name plate I made for my mother. She loves to scrapbook and was making name plates for some of her youtube friends. However, she did not have one.

View standing.

View lying down.
Have a great day!
Scrapbooking Mini Album: Spectacular Girl
Hi everyone. This is a mini album I made in August for a little girl. I just learned how to post videos to my blog. Hurray.


Enjoy!
Tuesday, November 16, 2010
Altered Libreta (Notebook)


The biggest sale day of the year is coming up. Wouldn't it be nice to remember what you're suppose to purchase-- in a fashionable way? As far as I can remember, my family has been participating in Black Friday. However, before we knew this day by such name we called it Midmorning Maddness. The problem on this day is not what to get, but recalling what one was suppose to purchase. This year I am ready! I created this beautiful Altered Libreta*** (notebook) to help me remember and prep for the day.
***No new paper was harmed in the making of this notebook. All scraps!
Materials:
· Cricut From My Kitchen Cartridge (Tabs Image no.39 cut at 2 inches)
· K&Company Terrie Conrad Paper (for Binding)
· My Mind’s Eye Totally Girl Paper Stack
· DCWV Summer Dream Paper Stack
· DCWV Café Mediterranean Paper Stack
· Michael’s Clock Rubon
Making Memories Classically Defined (adorable)
· EK Success Fleur de Lis Punch
· Provo Craft Stickers (stores)
· Making Memories Metal Embellishment (TO)
· Tim Holtz Mustard Seed Stamp Pad
· Tim Holtz Worn Lipstick Stamp Pad
· Tim Holtz Retro Circle Embossing Folder
· Sizzix Big Shot Machine
· Embossing Powder Tray
· Embossing Stamp Pad
· Clear Embossing Powder
· Glue Gun
· Scotch Double Sided Foam Tape
· Glue Glider Pro High Tac Adhesive
· Bazzil Cardstock (Pink)
· www.iamroses.com (for leaves and roses)
· Hot Glue Gun
· Folk Art Metallic Blue Sapphire Paint
· Cricut Paisley Cartridge (Snail)
· Zig Memory 2-Way Glue Gun
· Small Notebook (size 3 by 4.5 inches)
Tuesday, November 9, 2010
Paper Bag with Snail


Hi everyone, I was bored Saturday night, watching TV and playing with my Gypsy. The end result is this paper bag. I used the Tag, Bag, Boxes & More and Paisley Cricut Cartridge. I thought it would be great for baby showers, party favors, etc. Hope you enjoy and let me know how yours turned out.
Kiki
Materials:
· K&Company handmade Die Cut Cardstock (Mischievous)
· My Mind’s Eye Home Collection Paper Stack
· DCWV Café Mediterranean Paper Stack
· Recollections Rhinestones
· Bazzil Cardstock
· Scotch Double Sided Foam Tape
· Hot Glue Gun
· (1) 6” ribbon
· Cricut Paisley Cartridge (Snail)
· Cricut Tags, Bag, Boxes, & More Cartridge (Image no. 34)
· K&Company Portobello Road Paper Stack
· Zig Memory 2-Way Glue Gun
· Glue Glider Pro High Tac Adhesive or ATG Gun
· Rhinestone Butterfly
Methods:
DieCutting Images using Cricut Cartridges (Actual Size Off)
Tags, Bags, Boxes, & More Cricut Cartridge
Bag Image
Use the Fit to Page function to die cut bag (Image 34) on a 12” x 12” My Mind’s Eye sheet of paper. Fold bag along the preset lines, cut by the Cricut machine. Assemble and adhere using Glue Glider Pro Adhesive.
Paisley Cricut Cartridge
Snail Image
To die cut the different images from <Snail> one will need a 4” x4” cardstock to die cut image Shadow (non-shift).
The following will use all My Mind’s Eye Home Collection paper:
(2) 4” x 4” paper (different patterns) to die cut <Snail> (non-shift) and Snail-s>,
3” x 3” paper to die cut snail back Layer 1 (non-shift),
2” x 2” paper to cut flower Layer 1 (shift),
2” x 2” paper to cut circle Layer 2 (non-shift), and
1” x 1” paper to cut cheeks Layer 2 (shift).
All images should be cut at 11/2”. Adhere <Snail> to surface of <Snail-s>, and <Snail-s> to surface of Shadow snail using Glue Glider Pro or adhesive of your choice. Assemble and adhere, using Zig Memory 2-way Glue, other parts of snail as shown in snail image.
Putting it all Together
Cut a 2.5” x 2.5” piece of Café Mediterranean paper and tear along all four edges. Adhere to left side of bag, at a slant, using Glue Glider Pro (or adhesive of your choice). Glue snail to paper bag, at the bottom right corner, using Glue Glider Pro. Hot glue rhinestone butterfly to snail. Attach, with hot glue, 3 I am roses mini flowers to bottom left hand corner. Insert 6” ribbon in precut made by Cricut and tie two knots. Use Scotch Double Sided Foam Tape to adhere on the back of K&Company “mischievous” phrase. Adhere phrase to paper bag. Using scissors cut multiple pieces of Recollections Rhinestone flourishes and adhere to front and sides of bag.

You’re Finally Done!!! =)
Sunday, November 7, 2010
Sprinkled with Fun Card

This was made as a fun alternative to a B-day card. It's fun, simple, and mostly uses the "Sweet Treats" Cricut Cartridge. I rarely recommend anything, but this is one of the most delicious cartridges that I have purchased. Hmm, enjoy!
Materials:
· (4 Colors) Cardstock
· My Minds Eye Totally Girl Paper Stack
· DCWV Amber Autumn Glitte Cardstock Matstack
· K&Company Terrie Conrad Sweet Line Paper Stack
· K&Company Portobello Road Paper Stack
· Cricut Sweet Treats Cartridge
· (1) 6” ribbon
· Zig Memory 2-Way Glue Gun
· Glue Glider Pro High Tac Adhesive or ATG Gun
· 1/4 inch thick stick
· Tim Holtz Barn Door Stamp Pad
· Tim Holtz Forest Moss Stamp Pad
Methods:
Preparing Card Base
To make card base cut a 51/2” x 63/4” piece of cream cardstock paper and fold in half. Tear1/4” off the vertical edge of the card and apply forest moss stamping ink along all edges of card. Using My Mind’s Eye Totally Girl paper cut a 5 x 41/4” piece of paper and vertically tear ¼” off 5” end. Around the edges of the paper use Barn Door ink pad to create rustic look. Attach 6” ribbon to 41/4” vertical end of paper, using ATG gun, so distance off ribbon at top measures ½” and bottom measures ¼”. Stick My Mind’s Eye paper to the card at a slant.
DieCutting Images using Sweet Treats Cricut Cartridge (Actual Size Off)
Cupcake Image:
To die cut the different images from <Cupcake1> one will need a 5” cardstock to die cut image Shadow (non-shift), 4” x 8” cardstock do die cut Cards (non-shift), 4” x4” piece of Terrie Conrad paper to diecut cup cupck1-s (shift), 4” x 4” piece of Portobello Road paper to die cut cup Layers (non shift), 2” x 2” piece of Terrie Conrad paper for swirl Layer (shift), and 4” x 4” Chocolate Autumn Leaves Glimmer Stack paper for cupcake1 die cut layer. All images should be cut at 31/2”. Adere Card image to Shadow image using Glue Glider Pro. Adhere <Cupcake1> image to Card image. Assemble the remaining pieces of the cupcake image.
Sprinkled with Fun Image:
A 2” x 4” piece of cardstock paper is needed to cut <Sprnkled> and a 1” x 1” piece of Portobello Road paper to cut <Sprnkl-s>. Cut images at 13/4”. Attach Portobello Road “with” to “sprinkled with fun” phrase using Zig Memory 2-way glue.
Flower Image:
A piece of 4” x 4” Totally Girl paper is needed to cut <Flower3> and <Flowr3-s> image. A 2” x 2” piece of pink cardstock is needed to cut <Flowr3-s> image. Cut images at 13/4”. Ink around pink cardstock paper image <Flowr3-s> using Barn Door stamp pad and tilt petals up. Using ¼” stick curl <Flowr3-s> Portobello Road paper image petals inward. Adhere pink <Flowr3-s>. image to <Flower3> images, followed by adhering Totally Girl paper <Flowr3-s> image to pink <Flowr3-s> paper. Adhere a circle from <Cupcake1> Layers to the center of Flower image. Adhering was done with Zig Memory 2-way Glue.
Assembly of Card
Adhere cupcake, flower, and “sprinkled with fun” phrase images to card using Glue Glider Pro and Zig Memory 2-way glue.
You’re Finally Done!!! =)
Friday, November 5, 2010
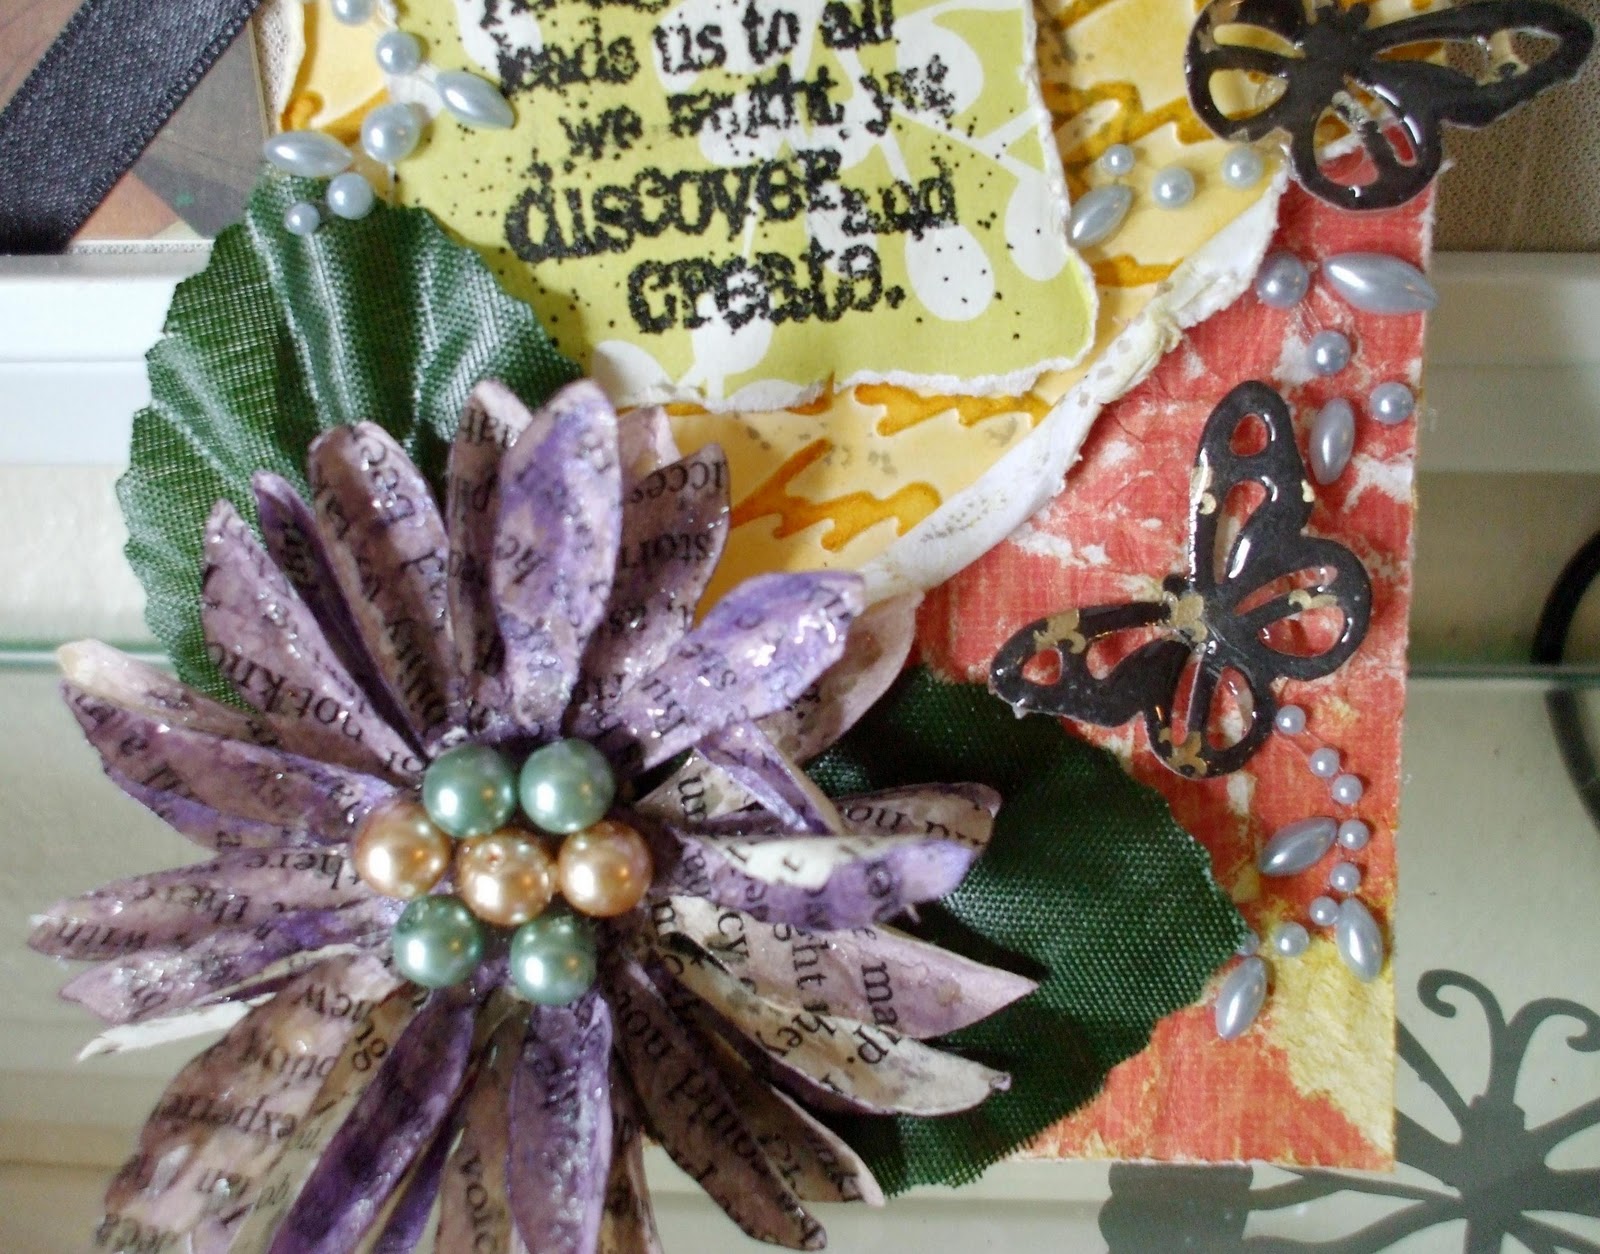
Scroll Tag


Materials:
· SEI paper
· DCWV Café Mediterranean Premium Stack
· DCWV Mariposa Premium Stack
· Martha Stewart Monarch Butterfly Punch
· Tim Holtz Alterations Tattered Florals Sizzix Die
· Cuttlebug Scroll Embossing Folder
· Prima Say it with Pearls Stickers
· (1) 6” ribbon
· (1) 3” x 6” Tag
· (2) Tim Holtz Foam Ink Applicator
· Heat Gun
· Folk Art Metallic Amethyst Acrylic Paint
· Large Stamp Block
· Embossing Powder Tray
· Tim Holtz Visual Artistry Flights of Fancy Stampers Anonymous Collection
· Glue Gun
· Scotch Double Sided Foam Tape
· Glue Glider Pro High Tac Adhesive
· PinkPaislee Impressions Cupid Collection
· (7) Crystallzz Pearls
· (2) Synthetic Leaves
· Tim Holtz Black Soot Distress Powder
· Embossing Stamp Pad
· Clear Embossing Powder
· Tim Holtz Spiced Marmalade Stamp Pad
· Tim Holtz Forest Moss Stamp Pad
· Tim Holtz Pumice Stone Stamp Pad
· Sizzix Big Shot Machine
· Spray Bottle containing water
Methods:
Dry Embossing and Stamping Tag
The 3” x 6” tag was lightly sprayed with water. Tag was placed between Cuttlebug Scroll embossing folder and the embossing folder was further sandwiched between cutting pad pair. The cutting pad pair was placed on Tab 2 of the Multipurpose Platform and rolled through the Sizzix Big Shot Machine. The tag was removed from Scroll embossing folder and Spiced Marmalade Stamping Ink was applied lightly to the embossed surface of tag using Tim Holtz Ranger Foam Ink Applicator. Once all embossed surfaces were covered, Pealed Paint Ink was used around the edges of tag. Using Pumice Stone ink stamp pad, ink was applied to PinkPaislee Impressions Cupid stamp of choice. Image was stamped along the right vertical side of tag.
Creating Dahlia Flower
Tim Holtz Tattered Florals Sizzix Die was used to create Dahlia floral image. Printed paper was placed on the foam side of the die and die was sandwiched between cutting pad. The cutting pad was rolled through Sizzix big Shott. Repeat this step 3 more times to obtain a total of 4 flowers. Metallic Amethyst Folk Art paint was used to high light leaves of each Dahlia die cut. Each Dahlia die cut was impressed, face down, into embossing stamp pad and each petal of Dahlia die cut was longitudinally folded in half. The Dahlia die cut then placed into embossing powder. The heat gun was used to melt and affix embossing powder unto Dahlia die cuts. The four Dhalia floral images were placed and hot glued to each other. Seven Crystallzz pearls were hot glued to the center of the Dhalia image and synthetic leaves were hot glued to the back of Dahlia image.
Creating Butterflies
Butterflies (5) were punched out on DCWV Mariposa paper using the Martha Stewart Monarch Butterfly Punch. All punched out images were impressed; face down, into embossing stamp pad. The Butterfly punched image was then placed into embossing powder and a heat gun was used to melt and affix embossing powder unto Mariposa cut outs.
Imagination & Create Phrase
Imagination Phrase was attached to large stamp block. Image was placed face down into embossing stamp pad and stamped onto SEI 7” x 5” paper. Paper with stamped image placed in embossing powder tray and Tim Holtz Black Soot powder was sprinkled over paper with stamped image. Heat gun was then used to melt and affix distress powder to paper. The edges of the SEI paper were torn to 2” x 4” to complete the look.
Prepping Café Mediterranean Paper
Café Mediterranean paper was torn at a diagonal. The paper was lightly sprayed with paper and the surface was lightly filed.
Compiling the Tag
Café Mediterranean paper was adhered to the right bottom corner of 3” x 6” tag with Glue Glider Pro. Dahlia flower was adhered to left bottom of tag using hot glue gun. The Imagination phrase was adhered to middle left side of tag, at a slant, using Scotch double sided foam tape. Prima Say it with pearls was cut into pieces and attached liberally to tag. Embossed butterflies were hot glued to various parts of tag and 6” ribbon tied to tag.
You're Finally Done!!! =)
Subscribe to:
Posts (Atom)